Friday, January 31, 2014

Details of a Quilt

     I just have about three hours left of some hand stitching and my latest quilt will be finished. It's very interesting to me to see how my work has been evolving. This piece is part of the body of work I'm developing in the voice I've discovered over the past 16 months. In this post I'll show you some detail photos of this piece. If you are interested in gelatin monoprinting, then you might want to visit my previous post where I show how I created a way to mimic the pattern of moldy spots on those permanent gelatin plates that never mold. (Some artists love the patterns the mold creates on the fabric... I'm one of those artists, but I don't want to have to keep throwing away moldy plates and remaking new ones.) Anyway, here are the photos.
bottom portion of the quilt depicting
layers of the Earth


top portion of the quilt
quilted much more densely
than usual for me
This top portion has a sun with stitching of "veins" appliquéd onto it now.
rock shapes I cut out from
monoprinted fabric
for my rock cairns
The white arrows are pointing to rocks I printed from permanent gelatin plates. The spots were artificially produced as described in my previous post. The other rocks were printed on natural plates a long time ago. Those spots were from actual mold. Up close and personal, I can't see a difference between the two. (The veins were painted on later.) I'm linking this to Off The Wall Friday where you can visit other art quilt blogs. Please make comments on their posts to let them know you stopped by.

Wednesday, January 29, 2014

Artificial Mold Technique

     I made a new discovery with gelatin monoprinting this week. I needed some more fabric for rocks for my rock cairn quilt that I'm making. The last time I printed fabric for rocks, I used a gelatin plate that had some spots of mold on it. (It was before I had put any glycerin in my gelatin plates to make them permanent.) The moldy spots made wonderful marks on the fabric that mimicked patterns of lichens and erosion on natural rocks. Well, now I have a permanent gelatin plate I made back in August and it has no mold on it. So I was thinking of cutting out pieces of dots of paper and using them as masks when I printed the fabric, but that would make very harsh and defined spots and wouldn't look too natural. So I had an idea and it worked great. The reason I'm posting this is because some people who are really into gelatin monoprinting wait for the magic time when the mold and cracks appear on their natural plates because of the wonderful patterns that can be produced from that.
1.) I mixed the color of paint I wanted and then added fabric medium (GAC 900).
2.) I spread the paint onto the gelatin plate with a brayer.
3.) Then I took a small syringe I had leftover from when I had to give my cat an oral medicine and dipped the end of the syringe (the plunger end; not the delivery end) into water).
dipping the syringe in paint water

4.) Then I carefully, so I didn't damage the gelatin plate, pressed the very wet end of the syringe plunger tip onto the paint to smear it a bit.
making marks on the painted gelatin plate

5.) Repeat steps 3 and 4 and let drops of water hit the painted plate here and there.
6.) Place the fabric onto the plate.
fabric on plate after being pressed down;
 notice drop shapes have appeared

7.) Gently rub the fabric down and notice the drop shapes appear on the wrong side of the fabric.
8.) Lift the fabric to reveal the pattern.
pulling off fabric from gelatin plate
 after printing several times
Here is a photo of rock shapes I cut out of fabrics made from my monoprints. (I painted on veins after the monoprinting). The rocks with the arrows are ones made with these latest fabrics on the permanent plate without mold. The ones without arrows are made from fabrics monoprinted a long time ago on a plate with actual mold on it.
rocks from monoprinted fabrics
I've since sewn these rocks onto my quilt and they look really great on it. I can't tell which rocks were printed from which kind of plate by just looking at them. I'm not ready to show the quilt yet, but here's a portion of it. All the fabric is gelatin monoprinted.
layers of earth


Thursday, January 23, 2014

Decision Time Again

     I've chosen background fabrics for my next quilt. I pinned them up on my design wall, rearranged them over and over. After I finally chose their arrangement, I cut them to size and sewed them together. This process took me about a week and a half. The sewing only took about half a day. It's the decisions that take me awhile. The fabrics were all ones I had monoprinted on my gelatin plate. I love each one of them so to make a commitment to cut into them is a big decision. But it's getting easier as I do more of it. I figure, if I change my mind, I'll use the cut pieces for something else smaller later on. I'm collecting all the scraps of these fabrics and plan to make some small mini art quilts soon.
     This quilt is a result of a sketch that I did in about 10 minutes. It just popped into my head one day, and I loved the result. It has three rock cairns, a sun/moon, and some interesting earth layers on the bottom with rocks tucked in them. The composition is a good one, I think. What will make or break the quilt will be how I use fabrics, stitch, and other surface designs. Here's the background sewn together. It measures about 34 inches wide by 42 inches tall. It's a bit wonky because, it is only the quilt top and doesn't have any support. It does lay flat when I put it down on my table and it will lay flat when stitched down on the batting. The golden colored fabric near the center is still pinned on in this photo. That was a recent decision. I need to cut it to the correct size and sew it on to replace the fabric underneath it. All of the fabrics are my monoprinted ones except for the three golden-colored rectangles. Those are commercial. They are from the Stonehenge line of fabrics.
current background
     Now I have to put it on batting and quilt it. I'm going to use a light gray thread and free-motion a pattern in the "sky" panels to suggest upward motions. There are five layers in the bottom. I'll use a pebble pattern in at least one of the layers. Not sure what I'll do in the others yet. (This background sat up on the wall for about five days while I decided how to quilt it.)
     After that, I'll apply a pillow-case backing. Then I'll appliqué the rock cairns through the entire sandwich, appliqué the sun/moon similarly, and quilt some more through all the layers. Then I'll see what else it needs. That's the plan anyway. Subject to change. (Oh, I'll probably eliminate several inches off of the top before I apply the backing... it looks too tall to me. Lesson learned on the previous quilt.) I'm linking this to Off The Wall Friday where you can visit other art quilt blogs. Please make comments on their posts to let them know you stopped by.

Thursday, January 16, 2014

ATCs; Not Just For Trading

     When I went to The International Quilt Festival in Houston in 2012, one of the things I did was to visit the famous trading post and trade ATCs (Artist Trading Cards). I took about 25 of my own with me to trade and made regular visits to the post during my 4 days there and exchanged my cards for others. Also, I traded cards with several members of my art group at home. I haven't decided what to do with most of them yet.
     But three of them I display on a shelf along with some very special souvenirs. On the shelf are rocks we've brought back from trips from all sorts of countries, Also on the shelf are pottery shards we've found on streets in Asia, beach glass we've found on a beach in Argentina, even a piece of a chain from a truck that broke off during a blizzard when we were stranded on a pass in the Andes on the border between Chile and Argentina (we were stuck there for three days...Brrr). We take turns making cairns from the various rocks and other pieces.
ATCs in action
The ATC on the left was created by Lynda Ozgur from New Smyrna Beach. She is a member of my art group, ArtsEtc and creates beautiful art quilts, garments, and fabrics. The ATC in the center is one I traded in Houston and was created by Dr. Sharon Hyll from St. Croix, United States, Virgin Islands. The ATC on the right I also traded in Houston, but the writing on the back was illegible so I can't give credit to its creator.
     I thought I'd share this way to use ATCs while I'm busy working on another quilt. It's at a stage where I'm not ready to share any photos yet. I have background fabric panels up on the design wall and have started sewing them together. This quilt will have three rock cairns on it if all goes well.
I'm linking this to Off The Wall Friday where you can find other art quilt websites. Be sure to make comments to let the artists know you stopped by.  Also, for you Friday visitors, if you scroll down to my last post, you'll see the solution to my focal point dilemma.

Tuesday, January 14, 2014

Focal Point Saved

     In my last post, I wrote that I had finished a quilt and then realized that suddenly I didn't like it. The problem that I saw, was that my focal point stuck out too much for my liking. I tried some quick fixes, but I didn't like them, either. So I took the quilt to two of my art friends and here is what we did.
     First of all, I can't show you the quilt because photos of it have been submitted to a show and I don't like to reveal quilts until the opening of the show (if they have been accepted) or until after they haven't been accepted.
    When I designed this quilt, I put the focal point in one of the "sweet spots" as I've learned from workshops and from reading texts. I followed the Rule of Thirds. You divide up your surface as in the diagram below and then put your major elements at the intersections of the lines. Those intersections are the sweet spots.
Rule of Thirds
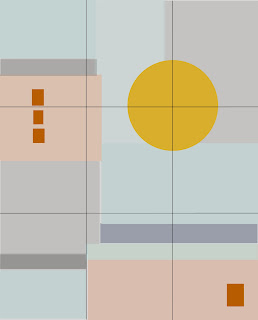
Now, remember, I don't have any formal art training. So I'm trying to learn as much as I can from workshops and books. This particular rule has really helped me in the past. It has kept me from putting my focal points in the dead center of my pieces as I used to think was the thing to do. So here is a general diagram of my design of my quilt. Forgive the colors and blocks. I drew them in Photoshop Elements and got tired of trying to get the exact colors. Also remember I used fabrics with lots of textures and shadings so the quilt has a lot more nuances. Also, the quilt has some design elements of thread sketching that I didn't attempt to include here. You can visit my last post to see the detail photo of the actual quilt.
Quilt with basic elements
     So I looked at it the morning after I finished it and this huge sun was staring at me. (The sun on the actual quilt has stitching on it so it isn't as boring as this.)  No, no, no. How could I not have seen that it was too low on the quilt. And that it was too big. But when I was making it, I auditioned smaller suns and they were too small. It had too much stitching to rip off and redo. Your eye went straight for it and ignored all the other elements on the quilt! Auggh!
     Originally, I had it placed higher on the quilt, but I decided to follow the Rule of Thirds and put it in its proper place.
Following the rules
     At home, before I took it to my friends, I knew I had to distract the eye from the sun, so I cut out some cloud shapes from the same monoprinted, gray fabric used elsewhere in the quilt and pinned them above the sun.
Distraction
Yes, they did the job, but way too trite. Not at all what I wanted for this quilt. I tried some sheer fabrics across the sun, but the stitching was so nice on the sun, I didn't want to cover it up.  One of my friends, Bobbi Baugh, had a brilliant idea. She picked up the quilt and folded over the top! "But what about the Rule of Thirds?", I asked. Well, we looked at it without those few inches at the top. I liked it better without those few inches so I cut them off and restitched the top closed. To further distract from the sun we three played around with some more squares of fabric and this is how the composition ended.
the final adjustment


So The Rule of Thirds, like all rules is a rule meant to be broken. Go with your gut. Feel free to visit Bobbi's website to see her beautiful art Bobbi Baugh Art . She had an article in Quilting Arts Magazine December 2013/January 2014 


Thursday, January 9, 2014

Another Quilt Done

     I finished my quilt for the entry to Florida in Fabric and will mail the CD tomorrow. I don't want to post the photo of the whole quilt until I hear if it is accepted or not but I'll post the detail shot I submitted.
Detail of Beach Walk
I was just about finished with the quilt. I had the pillowcase back on, had the quilting done, and realized that the focal point was too big and I didn't like the quilt! I liked it the day before. I took it to my two artist friends that I sketch with and they had a very simple solution. I'll blog about it soon. Needless to say I like my quilt again. I love learning about art concepts and I'll pass on what I found out. 
     I'm linking this to Off The Wall Friday where you can visit other art quilt blogs. Please make comments on their posts to let the artists know you stopped by.


Sunday, January 5, 2014

Spotted Balance

     My art group, ArtsEtc, started off with its usual sketching exercise last month from Carla Sonheim's book that I referred to in this post Sketching. The directions this time were to bring a photo of a giraffe. Using your dominant hand, touch your index finger to the outline of the giraffe photo and slowly follow the outline. As you do this, with your non-dominant hand, using a permanent, fine-tip marker on cardstock (without looking at the cardstock), make the mark on your cardstock that your index finger is following on the photo. I think we were given two minutes. Needless to say, we got quite wonky sketches of giraffes. But they had wonderful expressions and character. I think this is a great technique to use to get whimsical drawings. Then our homework was to make a composition of our giraffe sketch. I decided to keep in the spirit of my theme of my body of work when developing my composition so I modified my sketch while doing my homework.
Here's the photo I used. It's one my husband took when we were on a trip in Etosha National Park in Namibia in the south west part of Africa.
Giraffe in Etosha; Photo by Michael J. Dunn


Here's my quick sketch with my left hand without looking:
Wonky Giraffe

I liked his face. I thought he had a surprised look.
In my composition, I rearranged his legs and here he is in a similar setting as the cat and monk in the last such sketching exercise. If you want to see the cat and monk one for comparison, you can go HERE.
Spotted Balance
I'm having a lot of fun with these sketching episodes! Although I'm not planning to put them to fiber, They are helping me develop ideas and improve my compositional skills.